Showing posts with label inspiration. Show all posts

Monday, December 17, 2012

Art Deco in Los Angeles


I went on an architectural walking tour in downtown that focused on Art Deco buildings. I enjoyed every part of it (except for the part where the tour guide would get mad at me for falling behind the group because I was staring too long or taking too many photos). Other than that it was truly inspirational!


Art Deco design has really beautiful and strong characteristics and even though an entire space dedicated to that style might not be my personal taste, incorporating certain Art Deco elements or pieces into an interior can add that extra needed layer. The shape of a building can be inspiration for a custom table, a coiffered ceiling can be adapted to a more contemporary dining room, and metal carvings around a door can be translated into embroidery designs for bedding or pillows. I'm finding that taking things from the past and putting my own spin on them is the best way to create layered and interesting interiors that have depth and are uniquely my own.


Wednesday, September 5, 2012

Mood Boards: A Thesis Statement For Design


As I meet with a client for the first time and have them walk me through their space, we discuss what they love and hate about everything that is existing in their current home. We talk about their style and aesthetic and their design "dreams"... and then we talk about the best way to achieve those dreams while considering all that is practical and functional in their every day life.

I always encourage clients to gather photos of things they love, whether that be a fabulous pair of shoes, a photograph of the ocean, or a magazine interior that they've had saved for years. Being the visual person that I am, I'm always surprised and a little impressed with myself when the things they show me illustrate the style that I was already picturing for them in my head. To me this means that I'm becoming more in tune with people and understanding my clients better, and in turn, becoming a better designer.

To put my understanding to the test I create a mood board for my clients before I shop for any fabric, draft any floor plans, or specify any furniture. It's something that I haven't always done, but have found it to be an important part of the design process and the perfect first step before embarking on the sometimes long journey that is designing a home.

A mood board is meant to create a feeling and set the tone for the project as a whole. It can be added to or taken away from as the process goes along, but I have found it to be an important step in the beginning for a few reasons; it let's the client know that I understand them and the direction that they want to go, and it also provides a visual guide for the overall design concept.

I love mixing and matching, but that can also leave room to get off track and lose site of our aesthetic. The mood board acts as a thesis statement and as long as everything going in to the space references a color, pattern, texture, style, or feeling of the thesis statement, the home will have purpose and cohesion without being too contrived.

photos from Peter Dunham, Schylar Sampterton, Tabarak Studio 

Wednesday, April 25, 2012

The Design Process


Even though I've been in the interior design industry for 8 years, I'm still incredibly interested in other designers' processes; how they begin a room design and how to they put a presentation together for a client. Because it interests me so much, I thought maybe it would interest some of you as well.

I am working with a few really great clients right now, one of which is furnishing an entire home in Newport Beach with some minor construction throughout. We had our first presentation this week, so I thought it would be fun to share those images along with a step by step of how my design process works.

Initial Meeting
The process always begins with a phone call or email where we discuss the general parameters of the project and set up our initial meeting that will take place at the job site. The first meeting is where the client and I have a chance to meet in person and essentially decide if we like each other enough to embark on the intimate journey that is designing someone's home. Some clients will hire me solely based off my portfolio, others are looking for a friendship type connection, and every client is different.

At this initial meeting I encourage the potential client to pull photos of things that inspire them or that they are drawn to. This could be anything from interiors, art, fashion, etc. We also walk through the space as they tell me how they live and what their functional needs are as a family. This is really where I begin my assessment of how my potential client uses their home. We talk about everything from their work schedule, to how they like to entertain, to when they anticipate having children, to how many nights a week they eat in or out. Are they casual or formal? Are they introverted or extroverted? Are they big TV people or are they more interested in a cozy reading corner with great lighting?

The Agreement
After our first meeting, I type up a design agreement to be signed by the client and myself. It states the scope of work and my design fee. (A note about my design fee: Small consulting jobs are generally billed at an hourly rate and we work off of a retainer. Complete room or house design is billed at a flat rate based off of the square footage of the project.) If the client decides that they want to work with me, they sign the agreement, submit the deposit, and we're off and running.

Client/Designer Meet up #2
A second meet up with the client is usually required where we set the schedule for the job and I can take photos, collect existing floor plans, or take my own measurements to work from. We decide what areas we will address first and we discuss any additional information that we didn't address at the first meeting.

Achieving a Design Direction
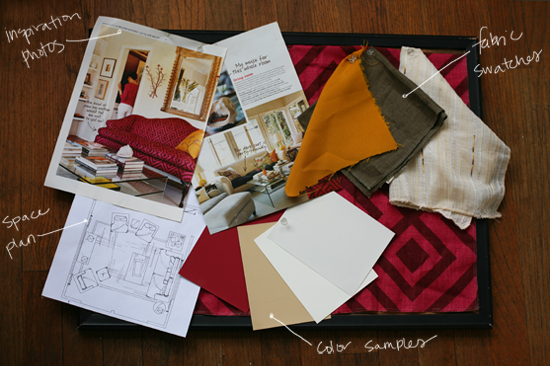
Now it's time to design! After taking what the client has told and shown to me, I look for that one thing that will act as the guide for the design. That one thing can be a photo of a room, a piece of art, or a swatch of fabric. Usually that one thing leads to a whole bunch of other things that begin to make up the design of the room. It's a process that evolves over the course of the next couple of weeks. I carry these pieces of fabric, wood samples, and photos around with  me everywhere, frequently staring at them for long periods of time to make sure I feel good about the design direction.


Furniture Space Plan
During this preliminary design phase, I also start working on the space plan (furniture layout). I usually do this in one sitting and create 2 or 3 options for each space. The space plan is crucial to determine what size of furniture pieces and how many are needed for the room. At this point I have a general idea of the style of furniture I want to incorporate, but I can't select the exact pieces until I know what size I'm looking for. You would be surprised at the difference 2" can make when I protrudes into a walk-way.

**Things that make a successful space plan**
-creates great conversation areas
-there is a focal point
-there is ease of access from one side of the room to the other
-the size of furniture is appropriate for the purpose of the room (deeper sofa in the TV      
        viewing room, daintier furniture frames in more formal spaces)
-the amount of furniture and its spacing fits the personality of the client and their lifestyle
        (minimalists = more open space with less accent furniture; collectors = cozier
        furniture layouts and more accent chairs, tables, and shelving)


Paring Down
To select furniture I do a combination of online shopping and showroom visits, while fabric shopping is done solely at the fabric showrooms. I have to see and feel the fabric in person to know if it will work. When all is said and done, I generally have way too many furniture, lighting, and fabric options. All of it goes well together, there is just too much of it. Clients are looking to me to give them the best design selections, not overwhelm them with 100 different options. The week before our first presentation is the time to pare down the options and start putting together the presentation board.


Presentation Board
I always put my presentations together on a cork board with push pins. If a client hates a red print that I have selected, the last thing I want is for it to be glued permanently in place. I need the ability to pin new options up, take existing options down, and swap the sofa and ottoman fabric. The items that I start with on the board are my top choices; the design that I 100% endorse and love. We start with that and then review additional options from my bag of tricks depending on how the client responds. For every selection; furniture,  fabric, and lighting, I will have at least 2 additional options to show my client.


Renderings
A colored rendering of the space plan is an absolute must when presenting a room design for the first time. Clients need to see how everything is laid out, how it flows, and get an idea of where color and pattern will be in the room. I will also include quick sketches with color (above) of certain areas of the room or wall elevations if I feel like it will help the client visualize the space better.

Feel free to check out my Pinterest board that I discussed in a previous post here, where you can see my design  journey and all of the additional selections that didn't quite make the final cut for the presentation.

Wednesday, April 18, 2012

Henri Matisse


I think art from the masters is an amazing way to identify a color palette. The texture of brush strokes and canvas can also inspire the textures of a room. Henri Matisse's masterpieces, specifically those from the Fauvism movement, are some of my favorite. The colors are so alive and remind me of spring. Time to make our way over to Paris to visit this Matisse show.

Matisse poster available here.

Wednesday, March 7, 2012

Public Speaking Debut


Two weeks ago I had the opportunity to talk to some high school aged girls that a friend of mine teaches at church. I'll admit when she asked me, I was actually really excited; an opportunity to speak about my all time favorite subject to a captive audience of young impressionable minds! Yes, it's true, I can talk about furniture, fabric, and architecture 24 hours a day, but I knew I had to keep things short and interesting to keep a 16 year old's attention on a Saturday. I thought back to when I was their age and I knew there were two things that were a must: lots of visual aids, and a gift for them to take home (because, let's be honest, everyone loves free stuff, even if they have no intention of putting it to use).


I wanted to put together an inspiration board to give them an idea of how they can use something like this as their guide when decorating their own rooms. One of my favorite interiors when I was first developing my aesthetic, and that I still love to this day is Ruthie Sommers' Santa Monica home that was featured in the premiere issue of Domino Magazine. It is an interior that most designers, bloggers, and pinterest users are all too familiar with. However, I knew it would be new to the girls so I thought it would be a fun room to use as a guide for my inspiration board. Also on the board I pinned up fabric and paint swatches that help define the color palate and overall feel, along with a scaled space plan of a living room. 


I gave them this little decorating kit to use for their own space. It included a cork board and pins so that they can create their own inspiration board, a folder to hold images and drawings, a notebook to jot down ideas and sketches, graph paper to create a basic scaled drawing of their room and furniture, and of course, a tape measure to help them create their space plan and to also take with them when bargain hunting around town. All of these things are necessary for me to organize my thoughts when working on a project of the largest or smallest scale, and I think they apply just as much to a teenage girl decorating her room.


One thing that I really wanted to focus on with the girls was the importance of accessories. If they didn't have the time, patience, or money to purchase or DIY themselves some new furniture, I wanted to stress the huge impact that even one vase of flowers or one killer piece of thrift store artwork can have on a plain space. I brought a lot of random accessories with me that I have collected over the years. I wanted everything that I brought with me to be around or under $10 so that the girls could see how accessible this was for them to do if they wanted to put forth a little bit of effort. I shared with them the price and where I purchased each item to get their wheels turning.


I emphasized simple but interesting and personal things that they could do with accessories. Some of these ideas were: use an old bottle as a vase and fill it with a couple of fresh picked daisies, fill a bowl or jar with a collection of something small such as seashells or spools of thread, create a piece of artwork by gluing rocks/buttons/paperclips onto a plain white sheet of paper and framing it with a ready-made shadow box frame. 

I tried to keep things simple and wanted to give the girls tips and resources that I thought would be applicable to them and their budget. I followed this outline during our little talk and gave each of the girls a copy. It has websites, shops, and ideas that I hope they, and you, find helpful!

Friday, December 9, 2011

Karen Alweil Studio


One of my favorite showrooms at the LA Mart is Karen Alweil Studio. She has a lot of cool product for people of all ages, but she has some especially adorable stuff for kids. One of the best parts about being the visual merchandiser for the CA Gift Show is that half of my job is shopping.
Related Posts Plugin for WordPress, Blogger...