Showing posts with label client projects. Show all posts

Thursday, April 12, 2012

Pinning Away


I'm really excited about a new client in Newport Beach. We are working on furnishings their entire home and I have found myself using Pinterest more at the start of this project than with any others that I have worked on in the past. I like that my pinned photos have links back to where I found them, which will be helpful to pull exact dimensions and obtain pricing once I have things narrowed down. I also like that I'm not taking up space on my computer with a bunch of photos that are now accessible anytime I'm online. I can't say that I am yet in need of a 12 step program for obsessive pinning, but I can't deny it's convenience for organizing images and ideas.

These are a few of the pins that I've added to my clients' board. For those of you interested in following me on Pinterest, you can find me here. I also recently added the "pin it" button to the bottom of my posts in case you see something around these parts that you want to add to your own boards!

Wednesday, April 4, 2012

Getting There


After finally getting over my sofa fabric debacle, my living room is starting to take shape, although we have a long way to go yet. When redoing vintage pieces, I always end up making my own modifications to make them more modern. I think with classic or designer vintage pieces, it's better just to leave as is, but if it's just a middle of the road sofa from 1970, why not do a few extra nips and tucks while it's already under the knife for re-upholstery?

My modifications to the sofa were: 

*New wood finish. The previous color was very orangy (not shown), typical of 70's furnishings.
*No more tufting. It could have stayed, but I just didn't like it for my vision of the room.
*You can't really see from the photo above, but there were wood pieces lining the top edges of the sides. It was about as weird as it sounds, so I had them shaved down and covered with fabric. 
*The sofa originally had 3 seat cushions and I made the decision to make a brand new bench cushion that was feather wrapped for extra comfort. It was a little extra money to scrap the foam in the old cushions and have a new cushion made, but it was worth it. Now the seat cushion is more uniform with the solid back, and it has that rumpled cozy look that you only get from a down-fill bench seat. I love that. 


We're getting there! At least we have seating and a couple pieces of art on the wall, and it's amazing what a bundle of blossoms will do for an unfinished room.

So far...

1. Jute rugs are more comfortable than sisal and work in just about any room. I randomly found this one for $89. Finding super deals like that frees up some of my budget to spend on more expensive upholstery fabric.

2. Santa Monica has the best farmer's market. Room changing blossoms for $6.

3. Covering my existing pillow fills with some fun patterns will really help bring the room to life. That is on my "to do" list right after drapery.

4. That mirror might be my best and most favorite thrift store find to date - it's big, made out of the perfect cream color rattan, and only cost me $8.

5. My coffee table is the first real piece furniture (that wasn't from Ikea) that I ever bought as an adult. I've had it for years, waiting for the appropriate time to put it to good use.

Tuesday, March 27, 2012

A Quick Little Teen Makeover


I've been working with the cutest family in Newport Beach on a quick little makeover project for the teenage girls' bedrooms. It was a quick face-lift and my client didn't want to spend a lot of money. The goal was to pick new paint, use what the girls already had, and pull the room together with accessories.

These before and afters aren't earth shattering by any means. Especially since my iPhone was recently stolen and all of the photos taken before rearranging furniture and painting the walls are lost (apparently I wasn't using "the cloud" correctly). But I still wanted to share the process to demonstrate what a few inexpensive accessories and fresh flowers can do to pull a room together.


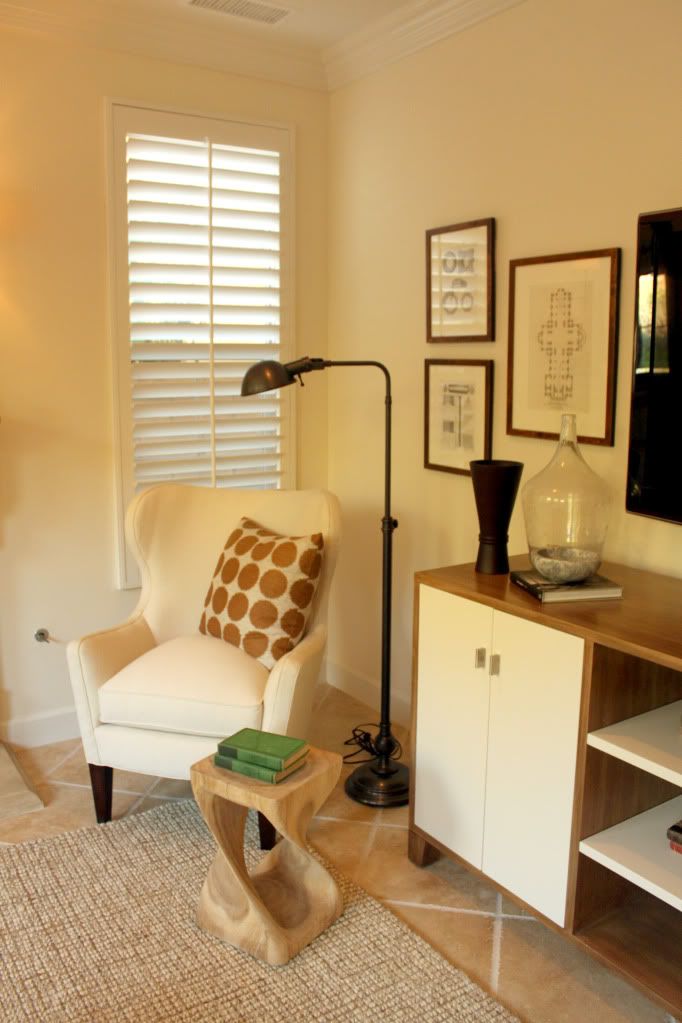
This particular daughter is an artist, and a very good one at that! Her artwork that we hung beside the bed guided the color palette for selecting accent pillows, a side chair, and a fun little ottoman.


Lamps, mirrors, and pillows can be found and your local Target or HomeGoods and they're really all you need to spruce up a stale space on a tight budget.


Bulletin boards are great wall art for teen rooms. They're inexpensive and take up a lot of space and are a great place for them to hang photos and notes from friends. The cork also also adds a warmer neutral that balances out all of the white furniture. 

This particular bed has a trundle underneath; a must-have for a proper slumber party (shout out to my best friend Kelli Bravo for always having a comfy trundle for me to sleep on in elementary school). Originally there wasn't anything to the left of the bed because it would block the path of the trundle bed. It didn't make sense to me to have an off balance bed 99% of the time to accommodate the 1% of time when the trundle would be used. My solution was an inexpensive light weight pedestal table that: 1. creates balance 2. adds a little color and 3. is easy to move when necessary.

Two lamps aren't necessary to frame a twin bed, and a lamp would have been cumbersome on the small table anyway. However, fresh flowers are always necessary.

A note about the navy blue lobster and seahorse art to the left: Selecting appropriate teen artwork is to walk a very fine line. I love the youthfulness of her bedding and it's bright floral motif, but going that same direction for artwork would have been too much. Design, even for a quick teen makeover on a budget, is about balance, compromise, and harmony. The lobster and seahorse brought out the small amount of Navy in the bedding, which was a nice contrast to the all of the happier greens and pinks in the room. Also, the subject matter was perfect for a Newport Beach bedroom and at $16.99 each, I really couldn't say no.


This vanity was originally in the other daughter's room, but we brought it in here so that she could have a place to do her make up and so the other bedroom could accommodate a lounge chair. Sometimes it's just about moving around what you already have and putting it in another room or maybe just on a different wall.

The mirror connected to the vanity just wasn't doing it for me. I think the proportion of it wasn't right for the wall or the vanity itself. We detached it and used this as an opportunity to bring in more contrast and texture with a grass reed mirror. 

In the before photo you can see the corner of a white chest at the end of the bed. Again, it was too much white and very boring. I found this small rattan chest in the bathroom section of a HomeGoods. I looked in the furniture section and didn't see anything but leather type ottomans, which was a little too sophisticated for this space. Note: If you need small and interesting storage or shelving for bedrooms or small living spaces...check the bathroom section!

Saturday, May 7, 2011

Family Room Installation, Irvine


While still in the design process during the months leading up to a room installation, I stress and worry over seemingly insignificant details to any non-designer. This list of decisions and worries consists of things such as: getting the wood finish just right on the custom furniture pieces (satin, gloss, high gloss, cerused, bleached, dark stain, light stain, medium stain...); deciding which white paint color works best with our fabric color palette (white-white, grey-white, linen white...); how high or low I should hang the wall sconces above the fireplace mantle (centered at the mirror, slightly above, slightly below); the proper shape of the ottoman to fit the room (square or rectangle); selecting the right faux finish for the fireplace (not too dark and just enough gray), selecting the perfect artwork that compliments the design of the room, but also has interest and meaning for my clients (and don't get me started on the matte and framing options: thickness, color, material, texture...); the list goes on.

But on installation day, when I get to put it all together, all of the little decisions that had to be made leading up to that point, significant or otherwise, all seem to be worth the thought and worry that went in to them. Installation days are hands down my favorite day to be a designer.

Here are some photos of my installation that took place this past week in Irvine, CA. The lighting is bad and doesn't show the colors accurately because the sun was going down when we finished (yes, it was an all day affair), but this will give you a glimpse until I have my photographer come to do a shoot.

Before photo:


A couple of progress photos:


Finished product:


(please excuse the unsightly lamp cord...)


The drapery panels need to stay wrapped at the base for 3 days to ensure that they fall and fold properly...


For interior design services in the Irvine or Orange County area, visit my website, www.BrittanyStiles.com.

Monday, September 20, 2010

Master Bath Remodel


Just wrapping up a master bathroom in Irvine. I worked with some pretty sophisticated clients with excellent taste! They had a clear vision of what they wanted from the beginning and had a heavy hand in the design process. We made a great team and I think the (almost finished) master bath looks amazing! Here are some photos that my client just emailed showing the remodel process...


View the same clients' living room and kitchen remodel here.

www.BrittanyStiles.com

Sunday, January 24, 2010

Furniture Install

Friday was a fun day because we were doing a furniture delivery at a client's home in Huntington Beach. I had gone to the upholstery shop earlier in the week to check on the different pieces, so I knew everything turned out beautifully, but I was excited to see it all in my client's home and see if she loved everything as much as I did.

I posted about the preliminary design for her dining room here, but as almost all projects go, for a variety of reasons, the design has changed a bit from the initial presentation. Due to budget, time restraints, and overall function, we forewent the built-in banquet when my client fell in love with this Restoration Hardware table...


She purchased the table, and to keep things interesting and eclectic, we decided we would do a settee on one side of the table and keep her dining chairs on the other side. When finding the perfect style, size, and color of the settee proved impossible, and having full confidence in my upholstery guy, we decided to go custom and build one from scratch.

We took the arm style, height, and nailheads from this Restoration Hardware chair...


And the tufting, wood turned legs, and scalloped base from this Ballard Designs settee...

And came up with the perfect red settee to fit my client's new table and new dining room...

It's always a little nerve racking to build such a large piece of furniture from scratch, but we couldn't be more happy with how it turned out!

Next up we have a really fun before and after. My client had 2 of these antique chairs and was about to put a 'for sale' sign on them in the front yard when I told her that they would be beautiful if we refurbished them.


The wood finisher refinished the wood in a silver leaf, and then the chair was reupholstered in a cream and chocolate silk damask. I loved how this chair turned out so much that I was tempted to pay my client and keep it for myself. This chair is going to sit in a corner of the dining room that is a little separated from the rest of the space. The chocolate and silver tones of the antique chair will help tie that corner in to the rest of the room.


Last but not least, we had an ottoman custom made for the sofa in the adjacent living room. Her living room is pretty much complete, but after going back and forth with a few coffee table options, my client finally decided she wanted a dainty oval ottoman. All of the other pieces of furniture in the room are solid, so I thought it would be fun to add in some pattern. I'm hoping to have the whole room photographed soon, but for now, here's our cute custom ottoman complete with tufts and pleated skirt...


Wednesday, September 23, 2009

Kitchen Face-Lift


There's nothing like a good kitchen make over! As fun as it is to start from scratch with new cabinets, new appliances, new flooring, etc., sometimes it's just as rewarding to just switch out a few necessities. Below is a before and then some after photos of my client's kitchen that we just recently completed. I had a meeting with her today and it was the first chance I had to see it all finished, so I was excited to take a few quick snap shots to share with you.

We kept the layout, cabinets, and appliances the same, but painted the walls, got a new back splash and counter tops, new knobs on the cabinets (that coordinate with the bronze liner in the back splash), and had an electrician install new pendant lights over the counter. We also kept the existing barstools and just had the seats reupholstered. My client was looking for a more contemporary look using clean lines and earthly tones. I was so pleased to help them with their kitchen face lift and I think we hit the nail on the head.


The "before" kitchen photo. Originally they purchased the model home in their housing development so there are some bold design statements that just needed to be updated.

Changing out the knobs or adding new knobs to existing cabinetry can make a big difference. The existing knobs were white so we wanted something darker that would stand out more and also coordinate with out new color scheme. The counter tops are thicker than standard counter tops, which I love, and that was actually my clients' suggestion to add to the more contemporary look they were going for.


The back splash is made up of glass brick tile, bronze liners, and a grey stone hexagon mosaic. My clients also added lighting under their upper cabinets, always a smart idea.

Related Posts Plugin for WordPress, Blogger...